
Laser levels are an essential tool for any project. Whether you are working on a DIY project, doing construction work or installing cabinets and drawers in your house, a laser level can make the work more efficient and accurate. Laser levels are not only used to level surfaces like floors, walls or ceilings; they can also be used as plumb points to check if walls or corners of buildings are vertical. Many different types of laser levels exist nowadays with many different features, but in this article we will focus on how to use laser level without tripod.
With traditional methods of leveling surfaces like using water level tubes or spirit levels it is sometimes very difficult to get the surface perfectly leveled, especially if you want to get the whole room leveled all at once. A laser level will do exactly that with minimal effort. It is by far the easiest and most efficient way of leveling surfaces and if you use a tripod it will also be the most accurate too!
The first thing you have to do is look for a laser level that will fit into your pocket. There are a lot of compact laser levels in the market, but not all of them are built with portability in mind. You have to consider the size and weight of the device. The best option for you is a lightweight design with an aluminum body that can also be used outdoors.
You should also consider getting a laser level with a magnetic base because it will allow you to use gravity as leverage instead of having to use two hands. A magnetic base also allows for more versatility when hanging things on walls and ceilings. For example, you can hang curtains or window blinds by placing magnets on both sides so they stick together horizontally like suction cups, instead of having one side higher than the other (which would require at least one hand).
For outdoor use, you can use a stick or a pole to help you see the laser beam. Simply hold the stick or the pole and point it towards yourself at eye level. It will reflect the laser beam and make it easier to see. You can also hold it in your hand to help you position the laser level on a flat surface when you’re working on your own.
Another way to use a laser level without a tripod is to place it on a flat-edged surface. You can use a wall, table or shelf for this. If you need the surface to be level, then you can use another laser level or any other leveling tool for that matter.
Regardless of what method you decide to use, make sure that the surface is sturdy enough to hold your laser level otherwise it will fall over and cause damage.
The simplest and easiest way to use a laser level without a tripod is to build one yourself. You can make your own DIY tripod by stacking together some wood blocks. The more of these you use, the more stable your DIY tripod will be. Try to choose blocks that are all the same size so that they stack neatly and evenly on top of each other.
Once you have enough wood blocks stacked together and stabilized, glue them together with a strong adhesive so they don’t fall apart. After that, place your laser level on top of the stack, securing it in place with another piece of wood or something similar so it doesn’t slide off.
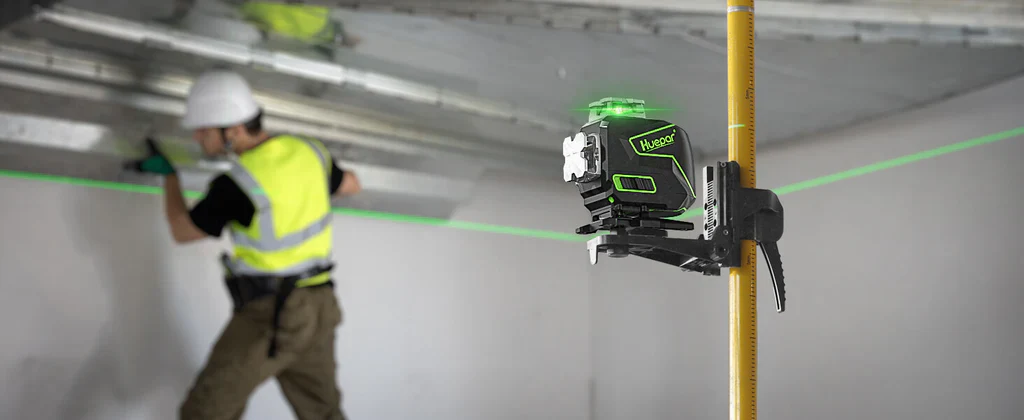
To use a laser level without a tripod, you have to keep the gadget stable. You can do this by attaching it to a metal surface, which is possible by using a powerful magnet. A magnetic base will give you an easy time doing this.
Attach the Laser Level to a Wall or Ceiling
Attaching your laser level to a wall or ceiling can be very helpful. You will get a lot more freedom of movement and often, you will get a better view of what’s going on when your laser level is attached to the wall.
Some laser levels come with magnetic attachments that can be fixed onto any metal surface. However, even if your laser level doesn’t come with an attachment like this, you can always buy one separately and attach it yourself. Just make sure that you buy a good quality magnet that is strong enough to hold the weight of your specific laser level model so it doesn’t fall off!
Alternatively, you can build your own magnetic attachment by using some strong adhesive glue and fixing some powerful neodymium magnets onto it. You can then fix this makeshift attachment onto your ceiling or the side of a wall.
You may also have a different kind of mounting option available depending on which kind of tripod thread screw you have in place at the bottom of your laser level device (usually either 1/4-20 thread or 5/8-11 thread). If you have 1/4-20 threads in place then there are special mounts available that are designed for attaching such devices to walls.
If you want to get the job done right at home, a magnetic holder attachment is essential. You can place it on any metal surface, or even use it on a pole or pipe. The great thing about this attachment is that it’s extremely versatile – and once you have one, you can use it over and over again without having to buy another one each time.
Just make sure the magnet is strong enough to handle the weight of your laser level. If it isn’t, the level could fall off and become damaged. Another option is to place your level on its side when attaching it to the magnet (this will reduce the weight load). And if you want more versatility with how much pressure you apply on your surface area, choose an attachment with adjustable feet instead of just two flat ones! That way, whether there’s some give in what might seem like an unlikely spot for mounting like a brick wall or even a concrete slab underneath where otherwise most levels cannot rest upon – these types of conditions aren’t obstacles anymore because now your mount has variable height options which allow you better control over how much pressure gets applied per surface material type depending on their characteristics (i.e., soft vs hard).
- Use Magnet and Mounting Base
A magnet is the easiest way to mount a laser level to a metal surface. You will have to purchase magnetic holders for most levels. However, it is an easy solution that does not require any special tools or mounting areas. You can attach a mounting base to the wall with screws or nails. Some bases are magnetic, which allows even more flexibility in the placement of the tool.
A laser level can be used in various ways. The most common use of a laser level is to ensure precision when performing tasks that require an even horizon. In the flooring industry, a laser level helps to ensure that flooring installation goes smoothly and meets expectations. When installing cabinets, tile or shelving, a laser level allows you to achieve perfect placement every time. A laser level also works well when hanging pictures and artwork; it helps you create even spacing between each piece so that your gallery wall looks beautiful.
If you are looking for an easy way to level something, then laser levels are an essential tool, both on the job site and around the home. Laser levels can be used with a tripod and they can also be levelled by hand. In many cases, laser levels can be used without a tripod.
In conclusion, a laser level can be used without tripod. To use the laser level without tripod, you need to set the surface of your working object on the same height as that of the laser level. For leveling line in height, you can use a rod or pole and make sure that it stands straight towards your working position. For setting up a horizontal line, you need to hold your laser level parallel to that line. After setting up the leveling line properly, you can turn on your laser light and start working professionally with its help. All these steps are easy enough for everyone and also help save time and energy during work if done properly with caution. I hope you find this post helpful for using a laser level without tripod easily and effectively at home or workplace while constructing or painting something professionally with high accuracy.